I just published two 100% Java mobile android apps using JavaFX on Github.
The first one, ‘Nop‘, acts as a base mobile app to use when developing mobile apps. It uses GraalVM with Gluon to build and deploy a native mobile app on your android phone. I will add an iOS version too as soon as I get my hands on an iPhone to test it on.
The Nop mobile android app actually does nothing, but has some interactions with your mobile phone and therefore uses the com.gluonhq packages besides org.javafx packages to do so (resulting in a popup from Gluon when using the free version). It also outputs the order of some initialization steps which are taken during startup and pause/resume moments for educational purposes.
The second mobile android app, ‘IceCo‘, does not use the com.gluonhq packages, it only uses org.javafx packages to create a simple conversion app (krónas to / from euros). It’s a really simple 100% pure Java mobile app for your phone. Best feature: it doesn’t collect your data like a lot of conversion apps most likely do ; )
This blog is about setting up a proper Linux Ubuntu environment to use when developing mobile applications for Android. Goal is to use 100% Java using JavaFX and IntelliJ.
I took an old laptop and luckily it had a SSD drive which still functioned. Here are some steps I took to get this laptop up and running for mobile Java development running Ubuntu.
First step is to goto https://ubuntu.com/download/desktop and download the iso image. Then proceed to https://rufus.ie/en/ to get the (portable) version of Rufus. Format a USB stick, put the iso image on the stick using Rufus. Actually, https://phoenixnap.com/kb/install-ubuntu-24-04 is a great guideline to install Linux. Most difficult part for me was to get my laptop to boot from USB (as you can imagine that should be quite easy, you understand installing Linux is easy).
Not really necessary, but sometimes useful, I installed SQL Developer (choose other platforms and just download the zip version). I’ve unpacked it in /pub/software/sqldeveloper. To get it to work using Java 17:
vi /pub/software/sqldeveloper/sqldeveloper/bin/sqldeveloper.conf
And put this on the second or third line
SetJavaHome /usr/lib/jvm/java-17-openjdk-amd64
The mentioned Java versions are for many reasons useful to have present on your system, but to develop mobile applications on your system, I use GraalVM with Gluon to build native images you can deploy and run on your phone. It is my experience that it’s a very delicate process to get all your add-ons versions aligned properly.
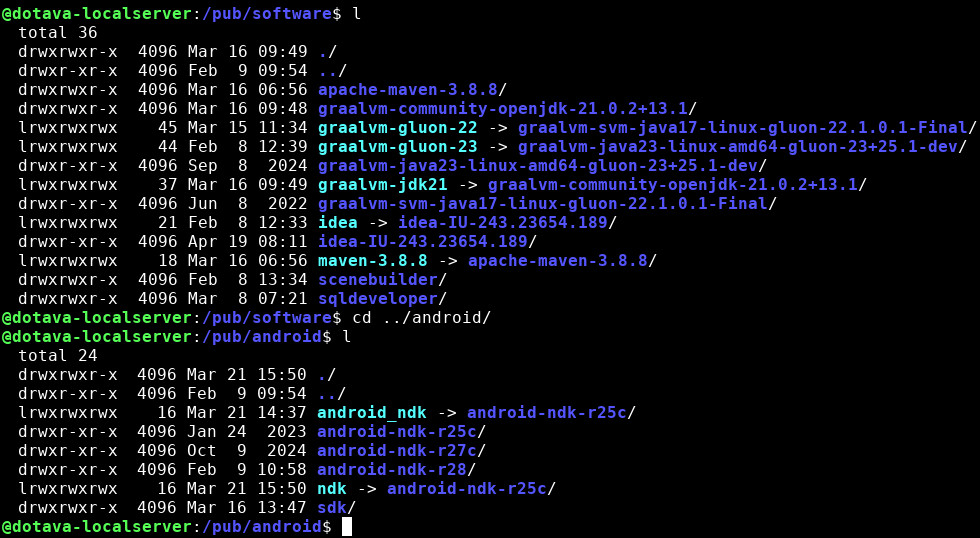
Besides the GraalVM with Gluon builds, it’s also useful to have a GraalVM JDK present (without Gluon), use https://github.com/graalvm/graalvm-ce-builds/releases for this. I’ve downloaded and extracted them in /pub/software.
When you’ve installed your favorite IntelliJ version, it comes with a Maven version (mine has 3.9.9 shipped), maybe download the 3.8.8 version as well from https://dlcdn.apache.org/maven/maven-3/3.8.8/binaries/ and put it in /pub/software. It might look like the following now.
The AA CC and CXX exports are necessary when you want to compile to native libraries. You’ll also notice the link from ~/.m2 to the Maven settings. This because IntelliJ sometimes resets the Maven settings back to ~/.m2
settings.xml (maven)
As you might have linked to the $M2_HOME/conf/settings.xml file. Or not, keeping a ~/.m2/settings.xml file is just as good. In all cases, the settings.xml should look something like this:
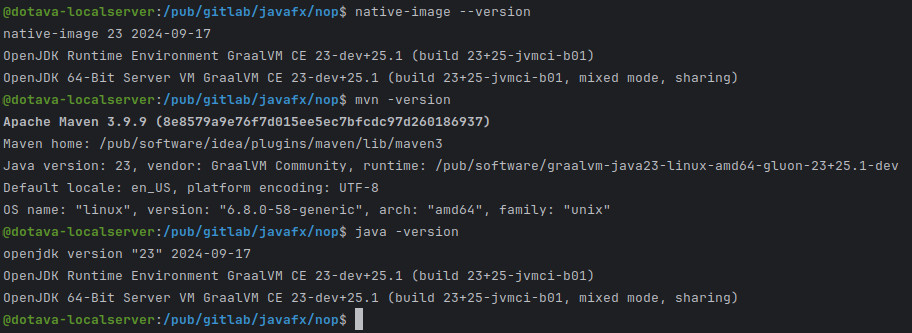
If you start IntelliJ using the script mentioned earlier, open a terminal and type the following:
native-image --version
mvn -version
java -version
When upgrading any part of your setup, make sure to keep the old versions and create a new startup script. Using this method, you can be sure to build the newer version of your mobile app alongside a current version which works.
First step is actually get it to work on your mobile phone, that’s the difficult one. After that, nothing is holding you back.
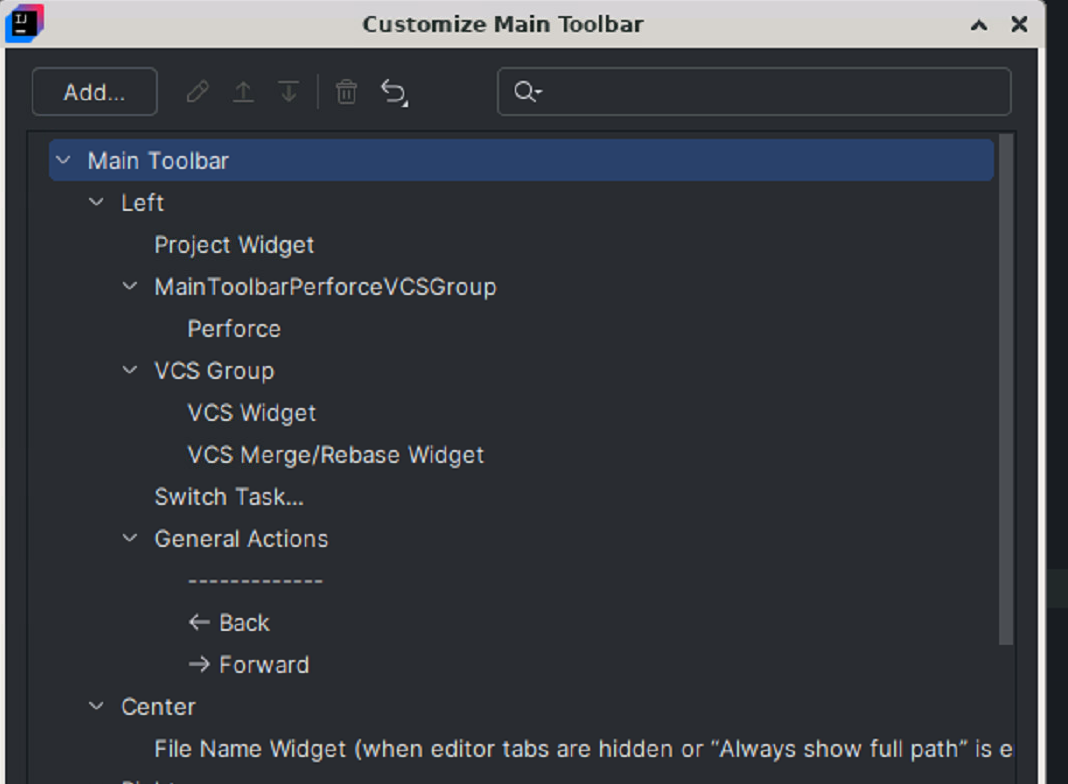
I’m a fan of using the Ctrl-Alt-Left and Ctrl-Alt-Right keyboard shortcuts, but in some environments (remote desktop connection within a Citrix connection) they just do not work and without enough privileges to change the desktop shortcuts for Linux, the following is nifty.
If not so already, make the toolbar visible: View -> Appearance -> Toolbar
Next, rightclick the Toolbar and select Customize Toolbar. In the Main Toolbar section, below General Actions press Add (Action) or on the dashed line, select add action below from the rightclick-mouse-menu.
Open the Main Menu, open the Navigate Menu. The first 2 options are Back and Forward : ) Hopefully, you have now this:
Suppose you have a @RestController with several calls to a repository (e.g. different attribute searches) and return the results in a list.
It might be useful to create a generic method in your controller so you don’t have that much duplicate code. In the method you can check for content, no content or some error.
Code can look like this:
protected <T> ResponseEntity<List<T>> getListEntriesWithCatch(String argument, Function<String, List<T>> retrievalFunction) {
    try {
        List<T> items = new ArrayList<>(retrievalFunction.apply(argument));
        return items.isEmpty()
                ? new ResponseEntity<>(HttpStatus.NO_CONTENT)
                : new ResponseEntity<>(items, HttpStatus.OK);
    } catch (Exception e) {
        logger.warn("Fetching list entries failes", e);
        return new ResponseEntity<>(HttpStatus.INTERNAL_SERVER_ERROR);
    }
}
Now you can call it with the repository as argument, like this:
The generic method is protected, so it can be tested more easily. And because it accepts any repository, you can create a custom function in your test instead of mocking your repo.