
Linux
This blog is about setting up a proper Linux Ubuntu environment to use when developing mobile applications for Android. Goal is to use 100% Java using JavaFX and IntelliJ.
I took an old laptop and luckily it had a SSD drive which still functioned. Here are some steps I took to get this laptop up and running for mobile Java development running Ubuntu.
First step is to goto https://ubuntu.com/download/desktop and download the iso image. Then proceed to https://rufus.ie/en/ to get the (portable) version of Rufus. Format a USB stick, put the iso image on the stick using Rufus. Actually, https://phoenixnap.com/kb/install-ubuntu-24-04 is a great guideline to install Linux. Most difficult part for me was to get my laptop to boot from USB (as you can imagine that should be quite easy, you understand installing Linux is easy).
Java
Install some java distributions:
apt install openjdk-17-jre-headless
apt install openjdk-21-jre-headless
apt install openjdk-17
apt install openjdk-21
Of course, download IntelliJ from https://www.jetbrains.com/idea/download/?section=linux and install it for example in /pub/software (and create a symbolic link called ‘idea’ to it).
Not really necessary, but sometimes useful, I installed SQL Developer (choose other platforms and just download the zip version). I’ve unpacked it in /pub/software/sqldeveloper. To get it to work using Java 17:
vi /pub/software/sqldeveloper/sqldeveloper/bin/sqldeveloper.confAnd put this on the second or third line
SetJavaHome /usr/lib/jvm/java-17-openjdk-amd64The mentioned Java versions are for many reasons useful to have present on your system, but to develop mobile applications on your system, I use GraalVM with Gluon to build native images you can deploy and run on your phone. It is my experience that it’s a very delicate process to get all your add-ons versions aligned properly.
GraalVM (with Gluon)
So, next step is to goto https://github.com/gluonhq/graal/releases and download some latest stable and latest dev versions.
Besides the GraalVM with Gluon builds, it’s also useful to have a GraalVM JDK present (without Gluon), use https://github.com/graalvm/graalvm-ce-builds/releases for this. I’ve downloaded and extracted them in /pub/software.
Besides the JDK, it’s also required to download Android NDK (for C or C++ usage) and the Android SDK (because I don’t want to use Android Studio). I’ve downloaded them to /pub/android from https://developer.android.com/ndk/downloads and https://developer.android.com/studio/index.html#command-line-tools-only
Maven
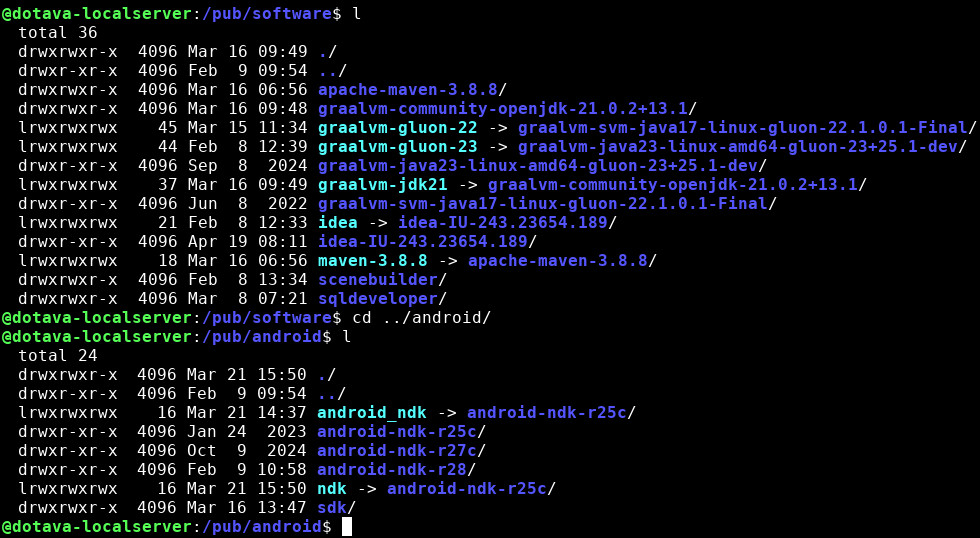
When you’ve installed your favorite IntelliJ version, it comes with a Maven version (mine has 3.9.9 shipped), maybe download the 3.8.8 version as well from https://dlcdn.apache.org/maven/maven-3/3.8.8/binaries/ and put it in /pub/software. It might look like the following now.
Some packages needed for JavaFX in the future:
apt-get install libfreetype6-dev
apt-get install libgtk-3-dev
From https://github.com/gluonhq/substrate, I read that also the following has to be installed:
apt-get install libasound2-dev libavcodec-dev libavformat-dev libavutil-dev libfreetype6-dev
apt-get install libgl-dev libglib2.0-dev libgtk-3-dev libpango1.0-dev libx11-dev libxtst-dev zlib1g-dev
I use the following startup script to launch IntellilJ
#!/bin/bash
export M2_HOME="/pub/software/idea/plugins/maven/lib/maven3"
export GRAALVM_HOME="/pub/software/graalvm-gluon-23"
export JAVA_HOME="/pub/software/graalvm-gluon-23"
export ANDROID_NDK="/pub/android/ndk"
export ANDROID_SDK="/pub/android/sdk"
export ANDROID_HOME="/pub/android/sdk"
export ANDROID_SDK_ROOT="/pub/android/sdk"
export ANDROID_NDK_ROOT="/pub/android/ndk"

# export AR="aarch64-linux-android-ar"
# export CC="aarch64-linux-android30-clang"
# export CXX="aarch64-linux-android30-clang++"

export PATH="$ANDROID_NDK/toolchains/llvm/prebuilt/linux-x86_64/bin:$ANDROID_HOME/platform-tools:$ANDROID_HOME/cmdline-tools/latest/bin:$GRAALVM_HOME/bin:$M2_HOME/bin:$ANDROID_NDK:$ANDROID_SDK:$PATH"

cd ~/.m2
rm settings.xml
ln -sf $M2_HOME/conf/settings.xml settings.xml

cd /pub/software/idea/bin
./idea
The AA CC and CXX exports are necessary when you want to compile to native libraries. You’ll also notice the link from ~/.m2 to the Maven settings. This because IntelliJ sometimes resets the Maven settings back to ~/.m2
settings.xml (maven)
As you might have linked to the $M2_HOME/conf/settings.xml file. Or not, keeping a ~/.m2/settings.xml file is just as good. In all cases, the settings.xml should look something like this:
<?xml version="1.0" encoding="UTF-8"?>
<settings xmlns="http://maven.apache.org/SETTINGS/1.0.0" xmlns:xsi="http://www.w3.org/2001/XMLSchema-instance" xsi:schemaLocation="http://maven.apache.org/SETTINGS/1.0.0 http://maven.apache.org/xsd/settings-1.0.0.xsd">
  <localRepository>/pub/repository</localRepository>
  <profiles>
    <profile>
      <id>artifactory</id>
      <repositories>
        <repository>
          <id>gluon-releases</id>
          <url>https://nexus.gluonhq.com/nexus/content/repositories/releases/</url>
        </repository>
        <repository>
          <id>maven-central</id>
          <url>https://repo.maven.apache.org/maven2/</url>
        </repository>
      </repositories>

      <pluginRepositories>
        <pluginRepository>
          <id>gluon-releases</id>
          <url>https://nexus.gluonhq.com/nexus/content/repositories/releases/</url>
        </pluginRepository>
        <pluginRepository>
          <id>maven-central</id>
          <url>https://repo.maven.apache.org/maven2/</url>
        </pluginRepository>
      </pluginRepositories>
    </profile>
  </profiles>
  <activeProfiles>
    <activeProfile>artifactory</activeProfile>
  </activeProfiles>
</settings>
IntelliJ
If you start IntelliJ using the script mentioned earlier, open a terminal and type the following:
native-image --version
mvn -version
java -version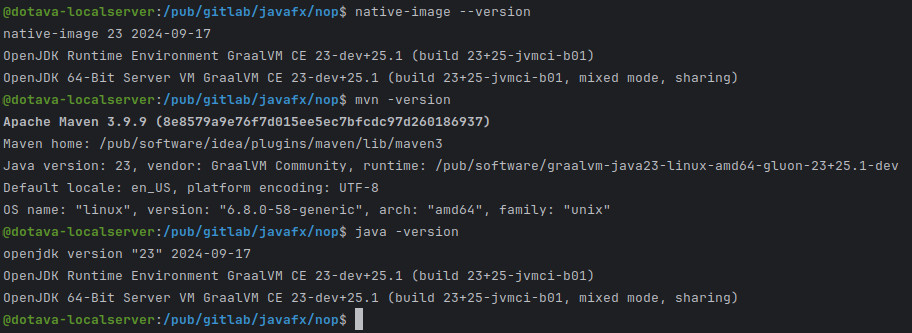
When upgrading any part of your setup, make sure to keep the old versions and create a new startup script. Using this method, you can be sure to build the newer version of your mobile app alongside a current version which works.
First step is actually get it to work on your mobile phone, that’s the difficult one. After that, nothing is holding you back.